How to Take Proper Body Measurements for Perfectly Fitted Clothes
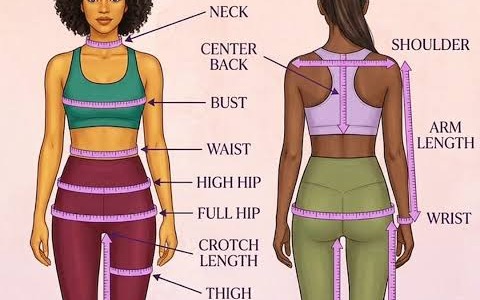
One of the biggest secrets behind a perfectly fitted outfit isn't just excellent sewing—it's taking accurate body measurements. Even the most beautiful fabric and flawless stitching can result in a poor fit if the measurements are incorrect.
Whether you're a beginner learning fashion design, a professional tailor, or someone ordering custom-made clothing, understanding how to take body measurements properly is an essential skill.
In this guide, you'll learn the correct way to measure the body for sewing, the tools you'll need, and common mistakes to avoid.
Why Accurate Body Measurements Matter
Proper body measurements help you:
Achieve a perfect fit.
Reduce alterations.
Increase customer satisfaction.
Save time and fabric.
Create professional-looking garments.
Remember, every great outfit starts with the right measurements.
Tools You'll Need
Before taking measurements, gather the following:
A flexible measuring tape.
A notebook or measurement sheet.
A pen or pencil.
A mirror (optional).
Someone to help (recommended for greater accuracy).
Tips Before You Start Measuring
For the best results:
Wear fitted clothing or lightweight garments.
Stand naturally without sucking in your stomach.
Keep your feet together.
Hold the measuring tape snugly—not too tight and not too loose.
Record each measurement immediately to avoid mistakes.
Essential Body Measurements and How to Take Them

1. Bust Measurement
Wrap the measuring tape around the fullest part of the bust, ensuring it stays level across the back.
Used for: Dresses, blouses, corsets, jackets, and tops.
2. Under Bust
Measure directly beneath the bust where a bra band normally sits.
Used for: Corsets, fitted gowns, bras, and bustier construction.
3. Waist Measurement
Measure around the natural waistline, which is usually the narrowest part of the torso.
A simple trick is to tie a string around the waist—it naturally settles at the correct waistline.
Used for: Skirts, trousers, dresses, and fitted garments.
4. Hip Measurement
Measure around the fullest part of the hips and buttocks while keeping the tape level.
Used for: Skirts, trousers, gowns, and jumpsuits.
5. Shoulder Width
Measure from one shoulder point to the other across the back.
Used for: Shirts, jackets, dresses, and blouses.
6. Sleeve Length
Start from the shoulder point, pass over a slightly bent elbow, and measure down to the desired sleeve length.
Used for: Long sleeves, jackets, kaftans, and gowns.
7. Armhole Measurement
Measure around the fullest part of the shoulder where the sleeve joins the body.
Used for: Creating comfortable sleeves with the right fit.
8. Bicep Measurement
Measure around the widest part of the upper arm.
Used for: Sleeves that fit comfortably without being too tight.
9. Neck Measurement
Wrap the tape around the base of the neck without tightening it.
Used for: Shirts, dresses, collars, and kaftans.
10. Back Waist Length
Measure from the prominent bone at the back of the neck straight down to the natural waistline.
Used for: Pattern drafting and dress construction.
11. Full Dress Length
Measure from the shoulder down to the desired length of the dress.
This could be knee-length, midi, ankle-length, or floor-length.
12. Skirt Length
Measure from the waist down to the desired skirt length.
13. Trouser Length
Measure from the waist down to the ankle or preferred trouser length.
14. Thigh Measurement
Measure around the fullest part of the upper thigh.
15. Knee Measurement
Measure around the knee while standing naturally.
16. Calf Measurement
Measure around the fullest part of the calf.
17. Ankle Measurement
Measure around the ankle where the trouser hem will rest.
18. Inseam Measurement
Measure from the crotch down to the ankle.
This measurement is especially important for trousers and jumpsuits.

Common Measurement Mistakes to Avoid
Many fitting problems happen because of simple measuring mistakes. Avoid these common errors:
Pulling the measuring tape too tightly.
Leaving the tape too loose.
Measuring over bulky clothing.
Forgetting to keep the tape level.
Guessing measurements instead of measuring.
Recording measurements incorrectly.
Using an old or stretched measuring tape.
Taking your time during this process can save hours of alterations later.
Pro Tips for Fashion Designers
Measure every client individually, even if they already know their size.
Reconfirm measurements for bridal and special occasion outfits.
Label every measurement clearly.
Keep client measurement records for future orders.
Re-measure if you're unsure—accuracy is always better than assumptions.
Final Thoughts
Learning how to take proper body measurements is one of the most valuable skills every fashion designer should master. Accurate measurements lead to better-fitting garments, happier clients, and a stronger professional reputation.
As your sewing skills improve, remember that precision starts long before you cut the fabric. A few extra minutes spent measuring correctly can make the difference between an average outfit and one that fits beautifully.
Watch the Step-by-Step Workshop
Dinat Signature
Dedicated to preserving Nigerian artisanal textile crafts while elevating contemporary pattern cutting, couture construction, and fashion education for makers globally.
Discussion & Feedback 0
Ask tailoring questions, share results, or contribute technical advice.
No comments posted yet
Be the first to share your thoughts or questions regarding this masterclass.
Leave a Comment
Join the conversation. All messages are moderated for respectful dialogue.